A New Year's
"Resolution": Sharpness EQ
Background
Once in a while when we
find or create something truly unique, the idea gets left behind as we
move on to new things. Ever bake something that was so good that
you ate it twice a week for a month and then just moved on to something
else out of sheer boredom? Ever come back to it a year later and
remember how good it really is and felt like you discovered it all over
again? This article falls into that category where we revisit an
old but very useful idea. Let's take a look at sharpness variance
in digital photos and ways to correct sharpness variances to bring out
more presence or 3D effect in photos.
The problem
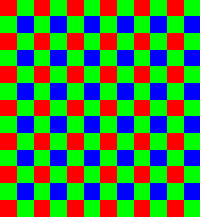
The vast majority of cameras on the
market use CFA's (color filter arrays) to capture only one color at each
pixel location. The Bayer CFA above is by far the most common
sensor type. Notice that only one color (red, green, or blue) is
captured at each pixel location on the sensor. Sophisticated
algorithms must be used to "predict" the missing two colors before you
get to the final full color image that you see from your camera or raw
conversion software. To complicate matters, there are twice as
many green pixels as red or blue, in part, in order to mimic the human
eye and its greater sensitivity to green compared to red/blue.
If you take a picture of a subject
with very little saturated color like a B/W resolution chart, snow
scene, the moon, or other objects without saturated colors, it is easy
to predict the missing colors because all three primaries (red, green,
and blue) will have about the same brightness. In these cases, the
missing green and blue values will be about the same as the red
brightness captured by a red pixel, red brightness at a green pixel will
be about the same as the capture green value, etc.. Once you start
photographing subjects with more vibrant colors such as fall foliage,
colorful Halloween costumes, or the worst case scenario: a red rose, the
amount of detail captured by the camera is significantly reduced.
As an example, consider the red rose. A red rose of a particular
shade will only excite the red pixel locations on the sensor, leaving
very little (usable) information at the green and blue photosites
(pixels). For the red rose, your camera's resolution just dropped
to near 1/4 of its total resolution due to the fact that the green/blue
pixels on the sensor are contributing very little information. In
cases like this, the problem actually becomes visible in photos!
Your red rose may look a little soft or out of focus compared to the
green leaves or brown parts of the stem that are in the same focal plane
because leaving you to wonder if perhaps your camera didn't focus on the
red flower as it should have.
If you train yourself to pick up the
problem, it is quite noticeable! A bright blue sweater in one
particular photo may look a little out of focus compared to a gray
sweater right next to it, you may find it difficult to get a truly sharp
photo of a blue flower while the green leaves around the flower look
sharp, and so on. This sharpness discrepancy for different colors
can alter the relationship between sharpness and depth of field and can
take away some of the 3D effect or "presence" that is seen on cameras
that capture full color (all three colors at each pixel) like the Sigma
SD9, SD10, and SD14. If you keep up with the reviews or visit
online forums, you will likely hear a lot of buzz about how full color
capture cameras like the SD9, SD10, and SD14 create photos with more 3D
effect than other cameras. The reason for that is in large part
due to the fact that full color capture cameras do not suffer from
sharpness discrepancies and capture all colors with the same amount of
detail. This leads to a much greater correlation between depth of
field and focus which is what adds presence or 3D feel to photos.
The remedy
Fortunately, some years ago I found
that you can take a (preferably unsharpened) photo and apply a special
adaptive sharpening algorithm to effectively reverse the effect of color
sharpness discrepancies. The image sensor in your camera cannot
capture all colors with the same detail, making certain colors (like
saturated red and blue) look considerably softer than other colors such
as gray or even green. The fix is to apply sharpening in such a
way that it sharpens saturated reds and blues the most, greens to a
lesser extent but still more than grays, and so on. While
sharpening can't truly add information that has been lost to single
color capture sensors, the adaptive sharpening technique can
produce a more visibly pleasing result so that bright red detail doesn't
look considerably softer than gray/white, green detail doesn't look
twice as sharp as blue, and so forth.
I created an algorithm that
effectively reverses sharpness discrepancies and called it the
"sharpness equalizer", adding it to the repertoire of image enhancements
in my own Qimage's batch
filtering tool. Simply select your USM (unsharp mask) and slide
the equalizer slider to the right to bias the sharpening algorithm to
compensate for sensor sharpness discrepancies. Using values like 2
for the radius, 150 for the strength, and the equalizer slider all the
way to the right (to try to compensate completely for sensor sharpness
discrepancies) increases the 3D feel of images and improves overall
clarity of photos. I made my algorithm available to Uwe
Steinmueller who also created a PhotoShop plugin that does the same type
of adaptive sharpening. See my
earlier article on the Outback Photo web site for details on the
plugin.
Since I have more than one dSLR
camera and I'm always comparing the latest models to my full color
capture SD14 for sharpness and 3D feel, I have recently rediscovered how
effective the sharpness equalization tool really is and I find myself
using it more often. Here is an example that shows how detail such
as red/blue can appear soft compared to B/W detail in the same focal
plane and how sharpness equalization can help resolve problems of
sharpness and depth:
| Original |
After sharpness EQ |
|
 |
 |
Notice how the color detail
(particularly the red) in the image on the left appears softer than the
B/W detail in the upper left quadrant. This is due to the sensor
having less information to work with when capturing saturated colors.
The red detail in the image on the left almost looks like it is in front
of (or behind) the B/W detail due to the red detail being a bit out of
focus. In reality, this is a test target on a flat sheet of paper
so all of the lines in each quadrant should have the same sharpness.
Take a look at how sharpness equalization has corrected this on the
right image. The color (red, green, and blue) detail is now just
as sharp as the B/W detail in the upper left quadrant. The
sharpness equalization has now effectively restored sharpness in the
photo and along with it the proper depth of field. To see examples
of how this works with real photos, see my
earlier article from Digital Outback Photo or download a trial of my
own Qimage batch
printing/processing software and look in the help under unsharp mask to
see how you can try this process on your own photos!
Summary
If you're like me and you want to get
the most detail out of your photos but you always find something missing
when capturing bright colors, take a look at the information in this
article. You may be noticing a discrepancy in sharpness/detail
produced by your camera due to the way your camera captures color.
Using sharpness equalization can help you gain more "3D effect" or feel
from your photos and increase the overall presence of the scene.
Mike Chaney


