|
admin
|
 |
« on: November 06, 2015, 11:38:24 PM » |
|
http://www.ddisoftware.com/qimage-uv2016.127 Nov 6, 2015 Priority: Low v2016.127 significantly improves raw photo detail and sharpness when using fill/HDR. Mike
|
|
|
|
|
 Logged
|
|
|
|
|
Terry-M
|
|
« Reply #1 on: November 07, 2015, 11:48:00 AM » |
|
Wow! what a difference. Here is my Autumn tree reflection image processed with v127 alongside the v126 version V126 v127 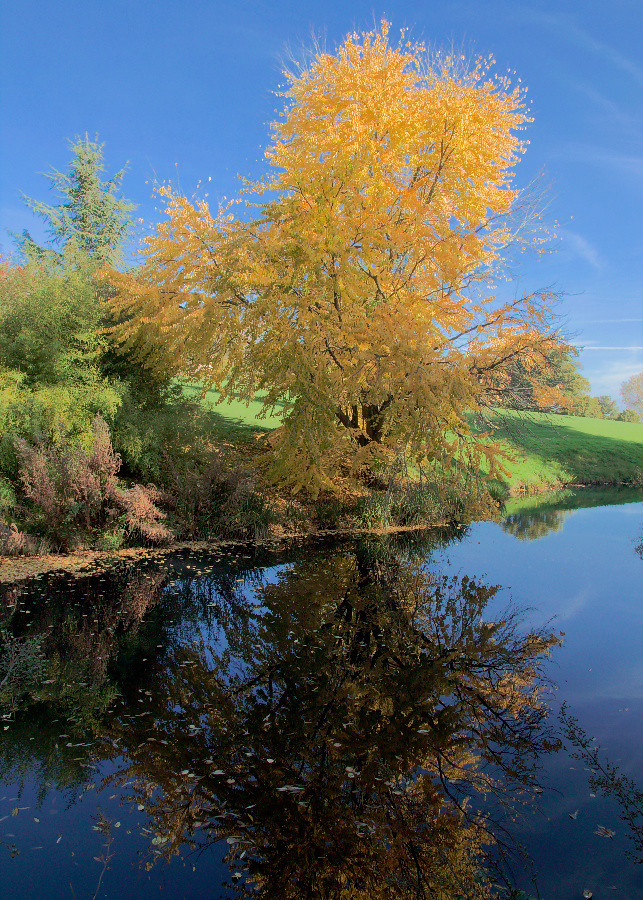 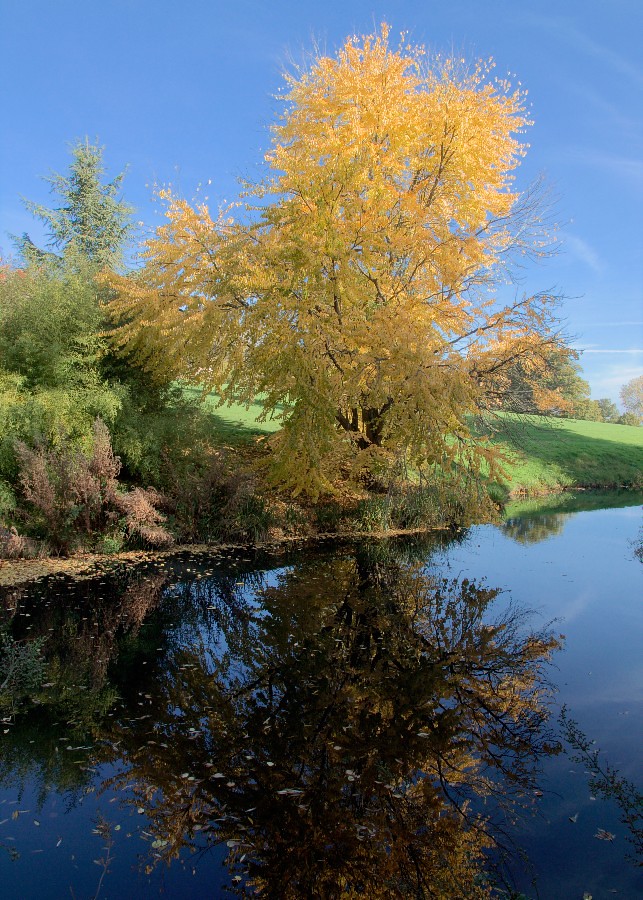 To convince you of the difference see below screen shots from the QU comparator, v126 on the left, v127 on the right. 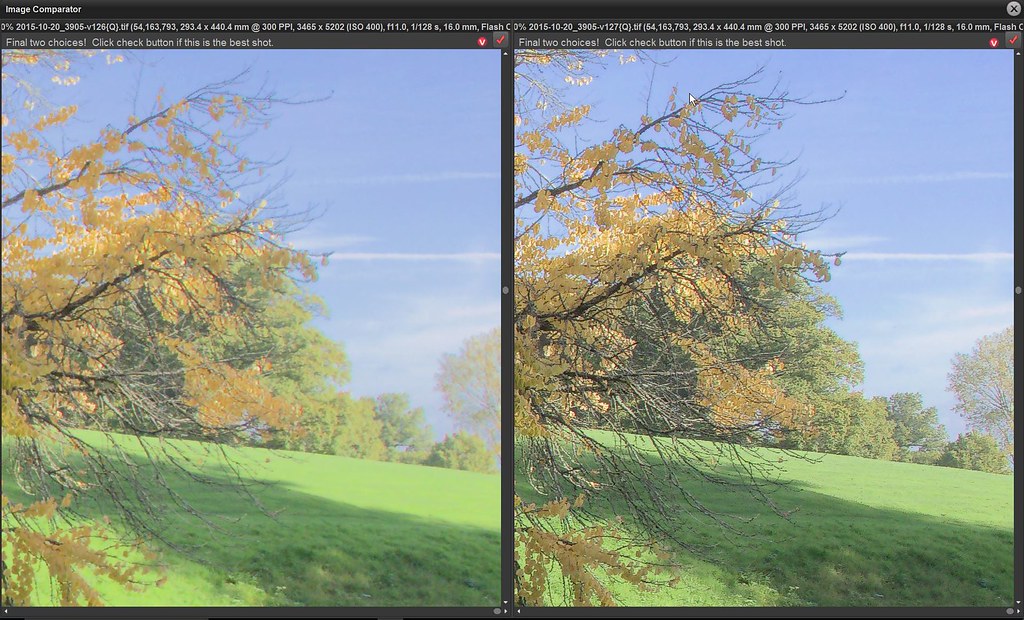 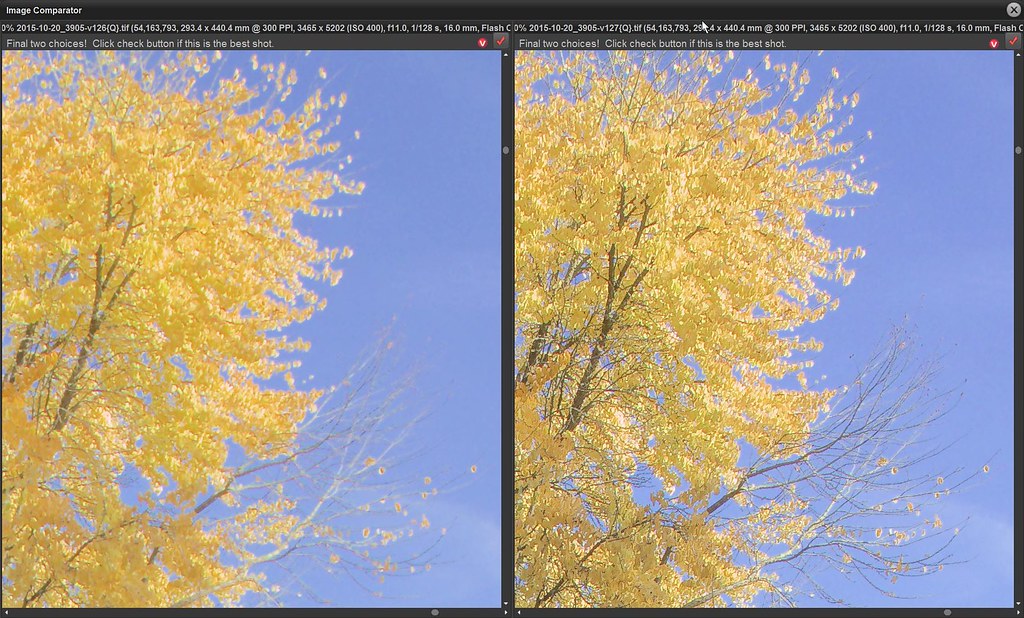 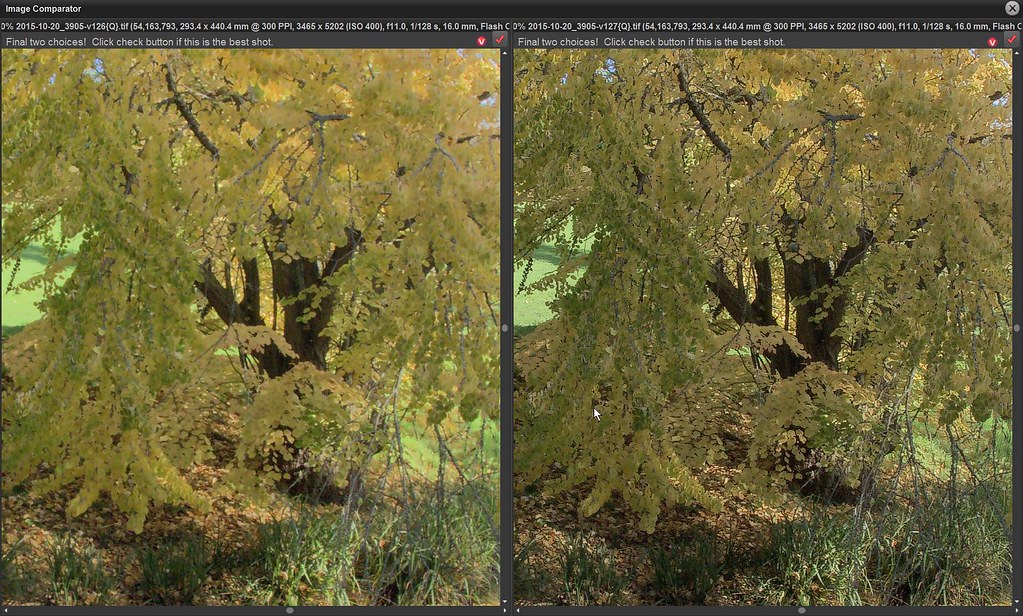 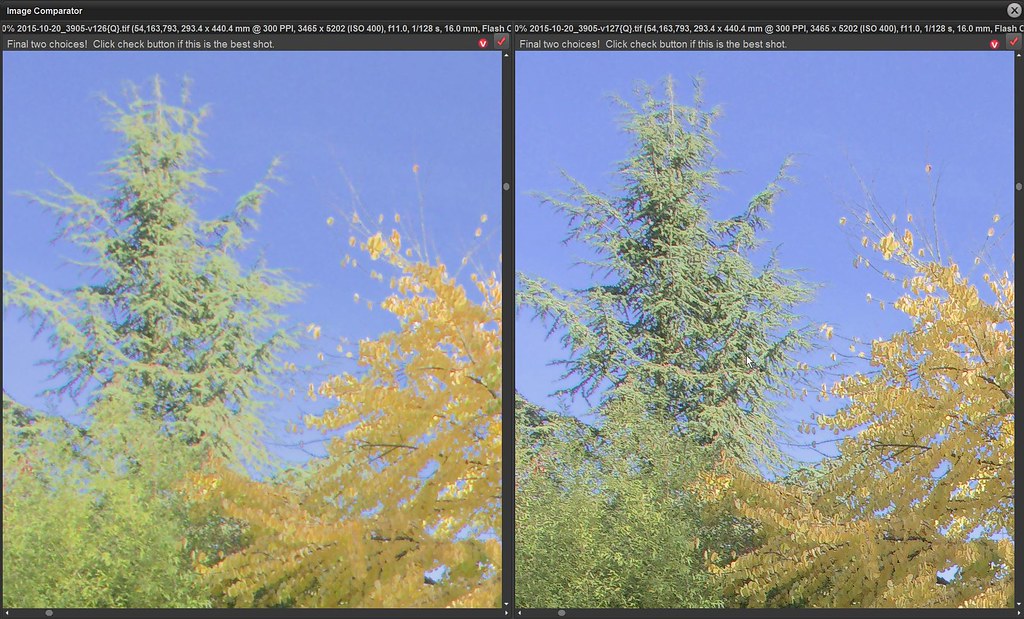 ... and if you ever need convincing about the virtues of shooting in raw, here is the camera jpeg version. 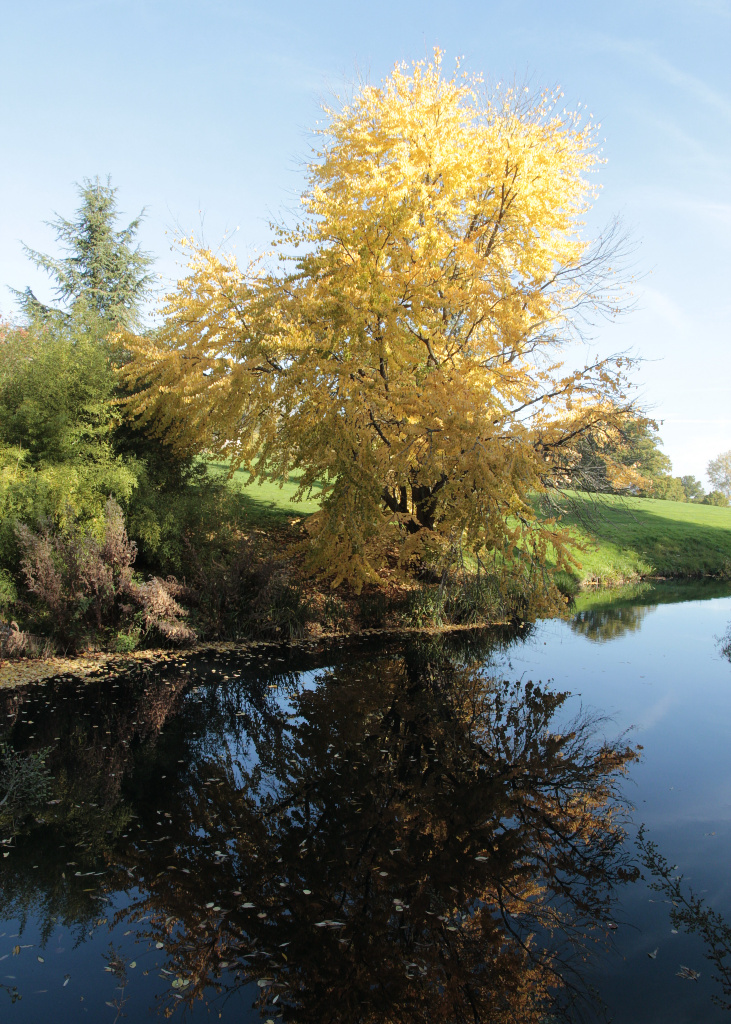 O yes, the actual scene was as dramatic as the raw version shows! Terry |
|
|
|
« Last Edit: November 07, 2015, 08:54:25 PM by Terry-M »
|
Logged
|
|
|
|
|
Jeff
|
|
« Reply #2 on: November 07, 2015, 11:57:47 AM » |
|
Thanks for yet another significant update.
As far as my quick test can tell, the HDR slider effect starts much earlier in the slide and it is easier for me to tell when I have gone far enough.
I hope this appraisal is correct.
As for posting images to forum, I have always been a little apprehensive, my thinking being that members are not interested in my often poor efforts.
I will post comparator images later, got them done but different browsers give different image size when image element right clicked.
Confuses this old brain box.
Jeff
|
|
|
|
|
Logged
|
Grumpy
|
|
|
|
Terry-M
|
|
« Reply #3 on: November 07, 2015, 04:49:40 PM » |
|
Hi Jeff, my thinking being that members are not interested in my often poor efforts. Yes we are, we can all learn from each other. but different browsers give different image size when image element right clicked.
I've checked with Firefox and Chrome, no difference. I suspect you are picking up the thumbnail image on your web site rather than the original. You need to click the thumb to open it and then right click to find the Image Info ....jpg row to copy. As far as my quick test can tell, the HDR slider effect starts much earlier in the slide and it is easier for me to tell when I have gone far enough.
I hope this appraisal is correct. Watch this space, a video may be on the way. Terry |
|
|
|
|
Logged
|
|
|
|
|
Jeff
|
|
« Reply #4 on: November 07, 2015, 05:36:05 PM » |
|
Thanks for yet another significant update.
As far as my quick test can tell, the HDR slider effect starts much earlier in the slide and it is easier for me to tell when I have gone far enough.
I hope this appraisal is correct.
As for posting images to forum, I have always been a little apprehensive, my thinking being that members are not interested in my often poor efforts.
I will post comparator images later, got them done but different browsers give different image size when image element right clicked.
Confuses this old brain box.
Jeff
OK here we go. Image of Entrance Gate to Greenwich Maritime Museum.  Default, Fill 11, HDR 0, Sc&AWB off  Fill 11, HDR 21 Sc&AWB off Jeff |
|
|
|
|
Logged
|
Grumpy
|
|
|
|
Terry-M
|
|
« Reply #5 on: November 07, 2015, 09:01:33 PM » |
|
Hi Jeff, As far as my quick test can tell, the HDR slider effect starts much earlier in the slide and it is easier for me to tell when I have gone far enough. I hope this appraisal is correct. You are generally right there but it does depend on the image and how much Fill has been applied so there's a bit of a learning curve to get used to the new and improved characteristics. Have you image with some clouds and/or fine detail against a sky with some colour or detail.You'll find that interesting to refine? I have an image with a stone church building in the middle distance where the improved detail in the stone block walls is very good. Maybe you have something similar? Terry |
|
|
|
|
Logged
|
|
|
|
|
Jeff
|
|
« Reply #6 on: November 08, 2015, 08:05:30 AM » |
|
Hello Terry Regarding posting full size images to forum. I had/have difficulty selecting the correct line, in fact cannot select a specific line in browser window, I have to copy the whole section and then paste into text editor and refine selection from there. However, I am feeling a rather a silly billy. Web site is created inside Chrome, if I go to 'preview' or view the full site in Chrome, open up the image and right click it, there is the option to copy the image url. Job done.   Jeff |
|
|
|
|
Logged
|
Grumpy
|
|
|
|
Fred A
|
|
« Reply #7 on: November 08, 2015, 11:14:58 AM » |
|
Jeff,
I think it is time to break down the meaning of HDR.
Highlight Detail Recovery.
In your sample images above, there seemed to be no lost highlights to recover. In fact you flattened the existing highlights and sort of spoiled the image.
If an image has a blocked shadow area or a darkened shadow area that would benefit from being lightened somewhat, and you add FILL light to accomplish this, and in doing so, the light/bright parts of the image lose detail, you move the HDR slider to recover what you lost.
Again, Highlight Detail (lost and found)
See attached quickie samples to illustrate the principle.
Mind you, I didn't spend a lot of time tweaking a tick more fill, a tick less fill, and a tick more or less HDR.
Just want you to grasp the principle.
It is used when you need to recover some lost detail due to a need to add FILL to brighten an area.
094 shows the original raw from the thumbnail showing the need to lighten the foreground to see the ground.
095 shows the area in the foreground lighter, but the loss of detail in the sky is obvious.
097 shows HDR recovering the detail that was lost due to the need to fix the foreground.
I got the drama of the sky back and still was able to keep the lighter foreground.
Hope some of this helps.
Fred
|
|
|
|
« Last Edit: November 08, 2015, 11:19:02 AM by Fred A »
|
Logged
|
|
|
|
|
Fred A
|
|
« Reply #8 on: November 08, 2015, 12:43:55 PM » |
|
Here's a duplicate post of the latest Challenge #55 HDR.... Huh Highlight Detail Recovery Seems like everything nowadays has initials; ADD, COPD, JPG, NEF, CR2, ED, IBS, STD.. etc HDR is out there in Qimage Ultimate, now in it's upgraded form, and seems to be very mysterious to many. In simple terms, HDR explains itself. You need to make an image lighter because of some dark and deep shadows, and in doing so, you lose detail in highlights. (Wedding dress with lace detail. Clouds that were dramatic and part of the image are now just white blobs.) I could go on and on... but simply put, we add fill light to open the blocked shadow areas, and add HDR to taste to recover anything we lost in the bright areas while adding Fill light. Here's an exercise to give some practice doing a really tough one. Try this out on some images that might improve using this exercise. Enjoy, https://youtu.be/W5BlqxfLc7sFred |
|
|
|
|
Logged
|
|
|
|
|
Terry-M
|
|
« Reply #9 on: November 08, 2015, 09:29:28 PM » |
|
Here's an exercise to give some practice doing a really tough one.
Try this out on some images that might improve using this exercise. Thanks for the video Fred. It inspired me to make one too on an afternoon too damp to clear autumn leaves in the garden. Here is mine. https://www.youtube.com/watch?v=TkNhUd1nAFQIt's a longer video using 3 different images, each requiring a slightly different approach. Please Note: I used a magenta rectangle in 2 of the images and a blue one in the other to initially recover some highlights. This will not always be necessary so always try without a recovery rectangle first and resort to that if recovery required cannot be achieved using the HDR slider. Remember to use the shift key to check for over exposed areas, as in my video.I hope some of you find this helpful. Terry |
|
|
|
|
Logged
|
|
|
|
|
admin
|
|
« Reply #10 on: November 08, 2015, 09:55:13 PM » |
|
Two excellent videos! Thanks for contributing!!!
Mike
|
|
|
|
|
Logged
|
|
|
|
|
Jeff
|
|
« Reply #11 on: November 09, 2015, 10:17:03 AM » |
|
Jeff,
I think it is time to break down the meaning of HDR.
Highlight Detail Recovery.
In your sample images above, there seemed to be no lost highlights to recover. In fact you flattened the existing highlights and sort of spoiled the image.
If an image has a blocked shadow area or a darkened shadow area that would benefit from being lightened somewhat, and you add FILL light to accomplish this, and in doing so, the light/bright parts of the image lose detail, you move the HDR slider to recover what you lost.
Hope some of this helps.
Fred
Fred I am not nit picking but do you not agree that I have recovered some highlights in the two areas marked. eg. I can just see the bulb/lamp through the street lamp glass Now going to look for more images to fiddle and look at videos.  Jeff |
|
|
|
|
Logged
|
Grumpy
|
|
|
|
Fred A
|
|
« Reply #12 on: November 09, 2015, 10:51:40 AM » |
|
I am not nit picking but do you not agree that I have recovered some highlights in the two areas marked.
Jeff, Opinions of this nature are just that, opinions. Opinions based on taste and what catches your eye. I think that the two items you point out as being recovered, (a chip of sidewalk at the farthest distance from the subject; "the gates"), and a light bulb which is unlit in daytime, are both so insignificant compared to what I see lost by dulling the light on the fence and the right side brick pillar. Nevertheless, you have made a good point. You can see the inside on the lamp glass showing a bulb in the HDR version, and that shows how really delicately powerful the tool can be. It's just a matter of taste. Would you believe Terry gives me all sort of Tsk Tsk, and tut tuts when he finds two pixels in my shot that show 255, 255, 255? " Terry, I like it like that!" "I think you should fix it. It draws my eye because those two pixels are blown" He's probably right. But yet, he asks me to select his images for submitting to be judged in contests, because I have some ability to "feel" a picture. So technically, you will get a better answer from Terry. Fred |
|
|
|
|
Logged
|
|
|
|
|
Jeff
|
|
« Reply #13 on: November 10, 2015, 12:07:39 PM » |
|
here is another of my older images which get better results with HDRv2 The cloud went into 255,255,255. Basing exposure on that area and tweaking fill and HDR gives a quite pleasing image with just a very small spot of 255's left unrecoverable.  Jeff |
|
|
|
|
Logged
|
Grumpy
|
|
|
|
|
|


