After-the-Fact White
Balance
Background
As stated in my
April 2007 article, there is no
substitute to getting the proper white balance before taking your
shots. Using a gray card or other white balance card to set a
custom white balance is always the most accurate form of white
balancing, but before-the-shot balancing is not always practical.
What if you (and your camera) are not in the same light as the subject
and you cannot easily get to the subject to take a reading? What
if the light source changes while you are shooting, as it might as the
sun goes behind clouds or as your subject runs across a ball field into
and out of shade? Sometimes we must resort to after-the-fact
adjustments to white balance. In this article we take a look at
two of the most common methods of after-the-fact white balance
adjustment to try to get the most accurate color.
What is white balance?
Different types of light cast a
different overall color onto objects. Incandescent (standard) light
bulbs produce a warm, reddish light while fluorescent light tends to
produce a cooler green-blue color. The "color" of the light source is
often referred to as the "color temperature" with red being on the warm
end of the spectrum and blue being on the cool end of the spectrum. Our
eyes easily adjust to this difference so that a white piece of paper
looks white under any color light, but cameras are a bit different. If
the "raw" image data is viewed without compensating for the color of the
light source itself, a white piece of paper will look red under warm
lighting and blue under cool lighting.
We compensate for light sources with
different color temperatures in photographic images by balancing the
red-blue shift. If a sheet of paper appears in the photo, for example,
and we know the sheet of paper is white, we can apply a red-blue bias to
force the paper to be white and in doing so, the remaining colors in the
photo will fall into place nicely. White balance basically amounts to
adding/subtracting red or blue in the image until the red, green, and
blue channels are equalized for neutral (gray or white) objects.
Getting the proper balance can drastically change the look and feel of a
photograph.
Method 1: click to
balance
If we have a neutral (gray to white) object anywhere in the photo, we
can use that neutral object to rebalance color in the photo. It
helps to have a little experience with what tends to be neutral in
photos. White shirts, socks, and things like sheets of white paper
are obvious targets but there are many other objects that can be used to
get a good white balance including concrete walkways, gray/old wooden
fences, some types of mulch, dead bark on trees/shrubs, and even asphalt
or white lines on roadways. Many times a candidate spot for white
balance exists when we don't immediately realize it. Also note
that adjusting white balance (regardless of the method) is always more
accurate when working from a raw image. JPEG images processed by
the camera can still be adjusted, of course, but since they have already
undergone color adjustments, any white balance adjustments are likely to
throw off color accuracy just a bit. The lesson here is to shoot
in raw mode with your camera if possible since that allows for the most
leeway in adjusting white balance and exposure.
As already pointed out, if you have a
white sheet of paper, white shirt, or gray concrete walkway in the
photo, try the obvious first. When you click with the white
balance dropper tool, be sure to click a spot that isn't too
bright! The term "white" balance is a bit of a misnomer in that if
we pick something that is truly white (255,255,255) in the photo, we are
sure to get white balance wrong because true white is clipped or blown
out. We are actually looking for an area that should be
neutral, but one that doesn't have more than about a 250 reading in any
color channel. For example, if we see what should be a white tee
shirt that currently reads 234,236,248, the shirt will have a blue tint.
In this case, the white balance is too cool (blue) and needs adjustment.
Clicking on the shirt with the white balance dropper should equalize the
color channels, make the shirt somewhere around 236,236,236, and in turn
will automatically correct all other colors at the same time.
When shooting something like flowers
and green leaves, many times you can find a near-neutral spot in the
out-of-focus background that you didn't see at first. Take a look
around and try clicking on different spots that look near-neutral.
It may take more than one click but when you get it right, you'll most
likely know it because the photo will likely look more natural. Of
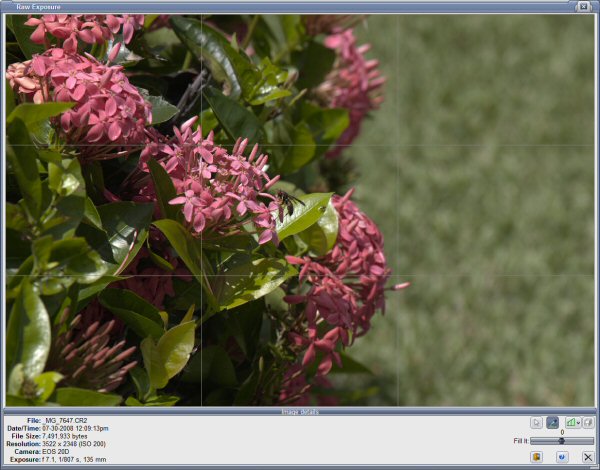
course, a good set of tools always helps. Take a look at the
following raw photo displayed in
Qimage Studio Edition's
raw refine tool:

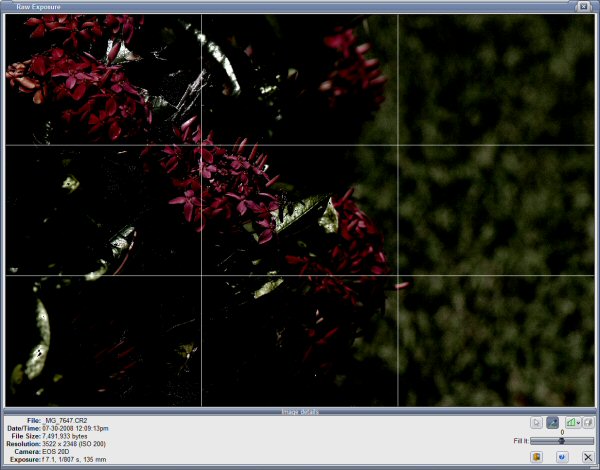
While it is tempting to think there
are no spots available to use a white balance dropper, a quick click on
the Ctrl key highlights areas that are near neutral in the photo:

The bright areas highlight near
neutral regions and we immediately see a few potential candidates for
dropper white balance. There are some specular reflections on
leaves that are basically reflecting the color of the sky and also some
dead leaves/branches that are gray. Clicking on some of these
spots produces slightly different white balance based on where you click
so more than one choice exists, but there is one in particular that
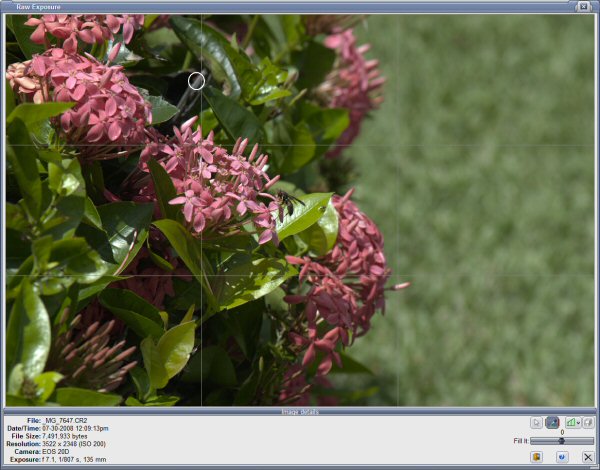
works well in this shot. Here are the before/after photos with a
circle showing where the white balance dropper was used:
Before:

After:

Turns out there was a dead
branch/leaf that made a good candidate for white balance (the area is
circled in the "After" shot above). So with a little help, we
found a good spot to take white balance in an image that at first
glance, appeared to have no neutral areas at all.
Method 2: color
temperature
Many raw tools offer the ability to adjust white balance by using a
color temperature slider. These sliders normally range from around
2000K up to about 20000K or more. The object here is to slide the
slider until the image "looks right". I saved this method for
method 2 because in my opinion, this should always be a last resort!
How an image looks or should look is always subjective and our eyes are
often fooled. Using a color temperature slider should be limited
to those very rare circumstances where there are absolutely no
candidates for white balance in the image or when the actual
color temperature of the scene is known or when you want to make
creative changes to the photo and you are not worried about accuracy.
Unless you have a color meter or you are working under very controlled
conditions, the actual color temperature is rarely known.
In addition, you may not realize that
using a color temperature slider is a compromise. In actuality,
color temperature sliders almost never get WB exactly right because they
depend on knowing the specific characteristics of the camera, sensor,
and raw data. Each model camera needs its own specific curves for
the color temperature slider to be truly accurate, and these curves are
almost never 100% accurate. In other words, if you set color
temperature to 5500K in three different raw conversion tools, you'll
likely get three slightly different looks because they'll each use a
slightly different color bias for the same (selected) color temperature.
Simply put, color sliders are not exact. It is always better to
"take a reading" using a white balance dropper whenever possible.
Of course, it is worth mentioning that a color temperature slider may
work better than the white balance dropper if you happen to pick the
wrong spot with your dropper, so the dropper method may actually take
more practice in actual use and may take a bit better "eye" for what you
are doing.
Summary: practice
makes... pretty good
I'd like to highlight again the fact that there is simply no substitute
for setting a custom white balance using scene lighting when possible
before taking your pictures. There simply is no better way, so
my plan of attack with white balance is usually to try to set a custom
white balance using scene lighting and a white balance or gray card at
the time of shooting if possible. When that is not possible, using
the dropper method comes next, followed by the color temperature slider
method as a last resort. With some practice, you can get pretty
good at recognizing spots for potential white balance readings and
you'll also improve your skills at knowing when a photo just "looks
right" versus having some sort of unwanted color cast. With a
little practice, using the white balance dropper can be more accurate
than just "eyeballing" the image while dragging a color slider, so
always try the dropper method first and move on to the color slider only
when you've exhausted potential neutral spots in the image and you've
determined that none of them are giving you what you want.
Mike Chaney


 Qimage registration expired? New lifetime licenses are only $59.99!


 Qimage registration expired? New lifetime licenses are only $59.99!